

Randomness is difficult to achieve. Our culture defines perfection as something flawless, and rewards us accordingly. However, as I've said before, perfection doesn't interest me, so I work hard to create flawed, uneven, irregular, intriguing beauty. It's not easy - sit down with a bowl of bead soup and try to string a totally random necklace. After a few minutes, you'll be looking for shape or size or colour to balance or break up a pattern that is emerging randomly, thus forcing a deliberate pattern. The secret is to limit time. If you don't think you have the time to complete it you'll just do it and not think about it. Or do it while you're engaged in something else, something left brain, like conversation. That helps also. I mention this to explain some of my decisions in the process; they keep me from being a perfectionist.
The Process:
Draw out your bracelet on paper. Measure and draw the wrist opening, leaving a little bit of room for wrapping faux bone slices around the inside edge. Within that shape, draw the paper reinforcement slightly inside the outer edge and slightly inside the inner, wrist edge. Trace that reinforcement shape and cut it out. Use it as a pattern for drawing two reinforcement shapes onto heavier paper (I use manila file folders). Cut these two out but leave the wrist hole intact until after the next step.
Draw the actual wrist hole (don't have it perfectly tight at this point because you still need a bit of room inside to wrap the faux bone around) within the inner circle and draw two registration marks across all three circles. This will help you line up your reinforcement template to see where you will cut out the wrist hole. You'll see what I do with this later on. Cut out the reinforcement template, leaving the inner circle with the thin strip around it. Cut off that thin strip and discard. Label the front of one wrist hole template (you only need one of these) and the two reinforcement templates.
 Run the registration marks around to the other side of both reinforcement pieces (and on the wrist hole piece) so the marks are on both sides. Lay one reinforcement piece on wax paper and brush on white glue. Let dry. Lift and flip over and glue the other side. White glue is usually PVA (polyvinyl acetate) which is closely related to polymer clay which contains a basis of PVC (polyvinyl chloride) resin and a liquid plasticizer (making it a plastisol), so they work well together. The glue bonds to the clay during baking. Just what you always wanted to know, right? ;-)
 While the glue is drying, use the second reinforcement paper form to cut out the scrap clay, rolled out on #4 on a #1 (thickest) to #7 (thinnest) pasta machine. Position the tip of the blade at approx. a 45 degree angle so the edge is beveled, tapering towards the outer edge. I put the clay on a sheet of dry wax deli paper so I can easily rotate it as I cut. Important: Flip the paper form over and cut out a second one, mirroring the first. Do not cut out the inner wrist holes in either one. This is one area where randomness comes in. Using a ready-made cutter would not be my choice.
I work with scrap clay at this stage in part because I like to use up the scrap clay, but also because, should I make a big cutting mistake, I can just ball the scrap
up and start over.

When the glue has dried, place the glued paper support shape into position on one of the cut scrap clay shapes. Make sure to put it in the proper orientation (that's why it's good to draw it freehand and slightly irregular. You'll notice my shape bulges out more on one side and is flat in one area - helps to align things as I go)
I now check to make sure the two halves are fairly even in shape. Spritz the back of one with water (so the second one won't stick to it) and line up the back of the second shape against it. Trim with scissors to even up if necessary.
If you had to trim, bevel that area to 45 degrees again.
Dry off any water before proceeding.

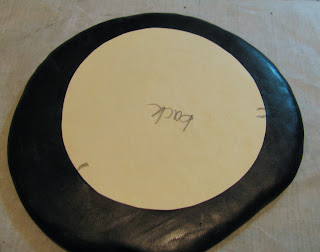
 Place both scrap clay shapes onto a sheet of black clay rolled out on #5 (thinner). Use the existing beveled edge to cut the black in an extended bevel.
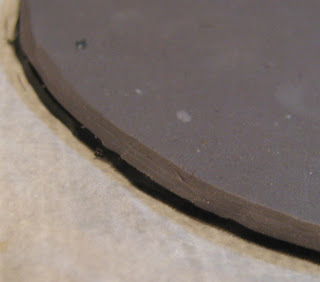 Close-up of the edge.
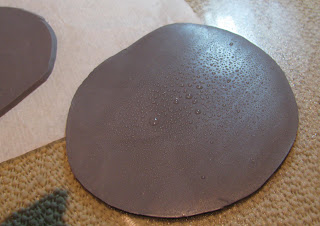
 Flip both shapes grey side down onto a sheet of dry wax deli paper. Gently push the edge down all around, curving the black outside edges of both halves.

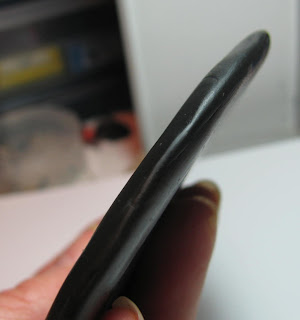
Ouside edge curved.
 As you smooth down the outer edge, check for any air bubbles and pierce them now. I use a #15 quilting needle which leaves a very small hole relative to the holes left by my X-acto knife tip or a needle tool (see picture to the right). Smooth lightly over the holes with your finger to close them up a bit.
Studio Tip #5: These needles are quite brittle and break easily. They are also difficult to pick up. Put a little thread through the eye, wrap the eye end in scrap clay and bake. Now it's easier to pick up and use. It's still brittle and needs protection (these things aren't cheap!) So I wad up some cotton fluff and stuff enough down a plastic syringe type vial that the needle is held high enough up the tube for me to grab and is protected for travel or whatever.

Place the glued paper support back into place on the grey scrap clay on one half of the bracelet. place the corresponding wrist cut-out, with the thin strip removed into place, lining up the registration marks.


 Cut all the way through along the edge of the wrist template for about an inch at each registration mark, cutting the specific registration mark as well.

One of the two registration marks cut through to the outside. (You only need to do this on the one half)

 Flip the wrist template over and place it on the outside of that half to check the registration marks are lined up. This is how you will know where to cut the circle for the wrist hole.
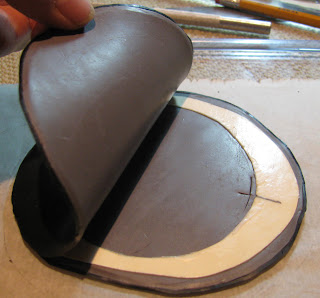
Place the second half on top, aligning edges, and gently press together.

Press the edges together all around and smooth out any seams.
Place the bracelet down so the registration marks show through. Put the wrist hole template in place, aligned with the registration marks.

Cut along the edge of the wrist hole template. I make several passes (around 6 to 7), going a little deeper each time. If you try to cut all the way through on the first pass you are more likely to distort this cut and distortion here is not a good thing. Remember there is a paper form inside and the difference between the embedded edge and the wrist edge is only as wide as that thin strip you cut and discarded, so you need to be fairly precise here. Remove the cut-out.
 It's time to slice our faux bone. I use a Thomas Scientific tissue blade for this (see the smaller, notched blade on the left, beneath the usually blade). I find this to be the best for thin slices.

Make a plethora of slices - ok, make a bunch! They can vary in thickness and don't dump any that are irregular. They work great in areas where you need to patch, as you'll see.

Start wrapping slices around the bracelet. I try to keep the slices going into the wrist hole thin or tear them there and stretch to bring them together. You don't want too much thickness there. Otherwise, I tend to line up the striations across the bracelet so it looks like it was cut from one piece of bone. that's a matter of preference and you could certainly wrap yours any way you choose. In lining up the striations, however, as the bracelet curves, you have excess faux bone angling down, so I tear these because I prefer a rough edge which I'll smooth out later. It gives me more random texture.

You will want to flip and rotate your slices so you get a random pattern in the faux bone. Otherwise it will become a very strong repetitive, unnatural pattern in the overall bracelet.

Continue to add faux bone slices until the entire bracelet is covered, front and back. You may choose to leave some small black areas open. Part 2 to come.

 |
| re-inforcement template |
 |
| wrist template |
Draw the actual wrist hole (don't have it perfectly tight at this point because you still need a bit of room inside to wrap the faux bone around) within the inner circle and draw two registration marks across all three circles. This will help you line up your reinforcement template to see where you will cut out the wrist hole. You'll see what I do with this later on. Cut out the reinforcement template, leaving the inner circle with the thin strip around it. Cut off that thin strip and discard. Label the front of one wrist hole template (you only need one of these) and the two reinforcement templates.


I work with scrap clay at this stage in part because I like to use up the scrap clay, but also because, should I make a big cutting mistake, I can just ball the scrap
up and start over.

When the glue has dried, place the glued paper support shape into position on one of the cut scrap clay shapes. Make sure to put it in the proper orientation (that's why it's good to draw it freehand and slightly irregular. You'll notice my shape bulges out more on one side and is flat in one area - helps to align things as I go)

I now check to make sure the two halves are fairly even in shape. Spritz the back of one with water (so the second one won't stick to it) and line up the back of the second shape against it. Trim with scissors to even up if necessary.
If you had to trim, bevel that area to 45 degrees again.
Dry off any water before proceeding.


Ouside edge curved.

Studio Tip #5: These needles are quite brittle and break easily. They are also difficult to pick up. Put a little thread through the eye, wrap the eye end in scrap clay and bake. Now it's easier to pick up and use. It's still brittle and needs protection (these things aren't cheap!) So I wad up some cotton fluff and stuff enough down a plastic syringe type vial that the needle is held high enough up the tube for me to grab and is protected for travel or whatever.

 |
| #15 quilting needle on left, acupuncture needle on right |


One of the two registration marks cut through to the outside. (You only need to do this on the one half)

 Flip the wrist template over and place it on the outside of that half to check the registration marks are lined up. This is how you will know where to cut the circle for the wrist hole.
Place the second half on top, aligning edges, and gently press together.


Press the edges together all around and smooth out any seams.

Place the bracelet down so the registration marks show through. Put the wrist hole template in place, aligned with the registration marks.

Cut along the edge of the wrist hole template. I make several passes (around 6 to 7), going a little deeper each time. If you try to cut all the way through on the first pass you are more likely to distort this cut and distortion here is not a good thing. Remember there is a paper form inside and the difference between the embedded edge and the wrist edge is only as wide as that thin strip you cut and discarded, so you need to be fairly precise here. Remove the cut-out.


Make a plethora of slices - ok, make a bunch! They can vary in thickness and don't dump any that are irregular. They work great in areas where you need to patch, as you'll see.

Start wrapping slices around the bracelet. I try to keep the slices going into the wrist hole thin or tear them there and stretch to bring them together. You don't want too much thickness there. Otherwise, I tend to line up the striations across the bracelet so it looks like it was cut from one piece of bone. that's a matter of preference and you could certainly wrap yours any way you choose. In lining up the striations, however, as the bracelet curves, you have excess faux bone angling down, so I tear these because I prefer a rough edge which I'll smooth out later. It gives me more random texture.

You will want to flip and rotate your slices so you get a random pattern in the faux bone. Otherwise it will become a very strong repetitive, unnatural pattern in the overall bracelet.

Continue to add faux bone slices until the entire bracelet is covered, front and back. You may choose to leave some small black areas open. Part 2 to come.

Awesome! Great job....the fact that you are so anal rententive comes in handy! lol
ReplyDeleteVery descriptive and easy to follow!
Have to admit I am pretty proud of my mom!
You make me blush! Thank you, Sweetheart. I'll bet Sheldon can't hold a candle to me, heh heh
Delete